1. Open the DAIMIA Connector Desktop Application
Launch the DAIMIA Connector application on your desktop.
2. Configure Server and License Settings (First-Time Login)
If this is your first login, navigate to the settings menu to configure the server and license details. These settings will be saved for future logins.
3. Enter Aras Innovator System Details
Provide the URL of your Aras Innovator instance in the settings menu.

- Aras URL: This is the screen where you need to enter the PLM (Product Lifecycle Management) server details.
- License: This is where the server information for the location of your license file is provided. The license file itself is supplied by DAIMIA and must be installed and configured by the server administrator.
- Port: Any port can be assigned for the license server, depending on the configuration. For example, port 9333 may be used, but another port can be selected if needed. The specific port is defined in the DAIMIA License Publisher Configuration.
- Validate Upon Exit: (Optional) This checkbox ensures that the system checks whether the server is accessible before saving the configuration. In other words, it verifies that the provided server addresses are available at the moment, preventing any issues related to connectivity before finalizing the setup.
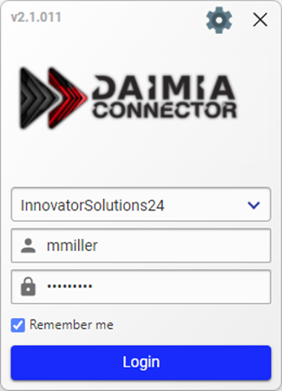
4. Login to DAIMIA Connector
Click the Login button to access the DAIMIA Connector.
DAIMIA Connector provides an intuitive environment for visualizing and interacting with PLM data. In this section, you will learn how to perform basic tasks such as creating custom layouts, navigating through the viewer tabs, and using 3D model features effectively.
Last updated on